728x90
달력을 구현 해보고자 한다.
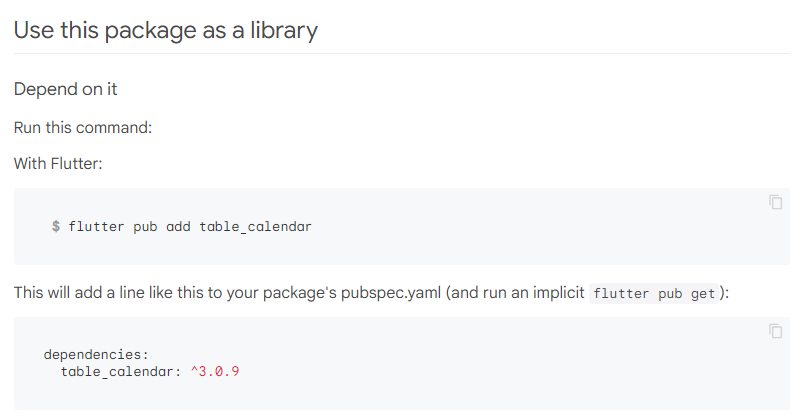
1. 패키지 추가
두 방법중 하나를 사용해서 패키지를 설치한다.
flutter pub add table_calendar dependencies:
table_calendar: ^3.0.9
2. 사용법
TableCalendar를 사용해보겠다.
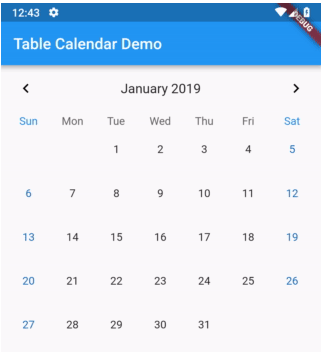
와 같은 형태의 달력을 불러온다.
import 'package:table_calendar/table_calendar.dart';


  Widget canlendar() {
    return Obx(
      () => TableCalendar(
          //포커스 위치
          focusedDay: controller.isFocusedDay.value,
          //달력의 최초 일자 ( 젤 앞으로 어디까지 넘길 수 있는가 )
          firstDay: DateTime.now().subtract(const Duration(days: 365 * 10)),
          //달력의 마지막 일자 ( 젤 마지막으로 어디까지 넘길 수 있는가 )
          lastDay: DateTime.now().add(const Duration(days: 365 * 10)),
          //언어
          locale: 'ko-KR',

          //높이
          daysOfWeekHeight: 20,
          rowHeight: 80,

         ........
    );
  }
와 같이 사용 한다.
firstDay, lastDay 는 달력을 어디까지 넘길 수 있는지 제약을 설정 하는 것이다.
언어, 높이 등의 기본적인 설정을 할 수 있다.
 headerStyle: HeaderStyle(
    formatButtonVisible: false,
    titleCentered: true,
    titleTextFormatter: (date, locale) {
      return '${DateFormat('MM').format(date)}월';
    },
    titleTextStyle: AppTextStyle().blackBold24,
    leftChevronVisible: false,
    rightChevronVisible: false,
  ),
headerStyle 은 < january 2019 > 의 부분을 설정 하는 부분이다.
헤더의 위치, 내용, < > 화살표 여부 들을 설정 할 수 있다.
기본적으로 해당 달력은 드래그로 다음달로 넘기는 기능이 있어 나는 false 로 설정 하였다.
calendarStyle: CalendarStyle(

    //마커
    markerDecoration: BoxDecoration(
      color: AppColors().titleColor,
      shape: BoxShape.circle,
    ),
    markerSize: 6,
    todayTextStyle: AppTextStyle().black14,
    todayDecoration: BoxDecoration(
      color: null,
      shape: BoxShape.rectangle,
      borderRadius: BorderRadius.circular(12),
    ),
    //마커

    //선택 셀
    selectedTextStyle: AppTextStyle().blackBold16,
    selectedDecoration: BoxDecoration(
      color: null,
      shape: BoxShape.rectangle,
      borderRadius: BorderRadius.circular(12),
    ),
    //선택 셀

    //기본
    defaultTextStyle: AppTextStyle().color19191914,
    defaultDecoration: BoxDecoration(
      color: null,
      shape: BoxShape.rectangle,
      borderRadius: BorderRadius.circular(12),
    ),
    //기본

    // 전,후 달의 일자 표기여부
    outsideDaysVisible: false,
  ),
calendarStyle 은 마커, 선택 셀 , 기본 셀 , 등의 설정을 할 수 있다.
selectedDayPredicate: (day) {
    return isSameDay(controller.isSelectedDay.value, day);
  },
  onDaySelected: (selectedDay, focusedDay) async {
    if (!isSameDay(controller.isSelectedDay.value, selectedDay) &&
        controller.isTouch.value == true) {
      await controller.onDateSelected(selectedDay, focusedDay);
    }
  },
  eventLoader: (day) {
    return controller.eventGetLoader(day);
  },
  onPageChanged: (focusedDay) async {
    controller.onDateSelected(focusedDay, focusedDay, gubn: 'month');
  },
  calendarBuilders: CalendarBuilders(
    selectedBuilder: (context, day, focusedDay) {
      return Container(
        decoration: BoxDecoration(
            color: AppColors().coloraaaaaa,
            borderRadius: BorderRadius.circular(10)),
        child: Center(
            child: Text(
          int.parse(DateFormat('dd').format(focusedDay)).toString(),
          style: AppTextStyle().blackBold14,
        )),
      );
    },
    markerBuilder: (context, day, events) {
      if (events.isNotEmpty) {
        return Positioned(
          right: 1,
          bottom: 1,
          child: Column(
            crossAxisAlignment: CrossAxisAlignment.end,
            children: [
              Text(
                controller.getDaySumMoney(day, '0'),
                style: AppTextStyle().black10,
              ),
              Text(
                controller.getDaySumMoney(day, '1'),
                style: AppTextStyle().colortitle10,
              ),
            ],
          ),
        );
      }
      return SizedBox.shrink();
    },
  )),
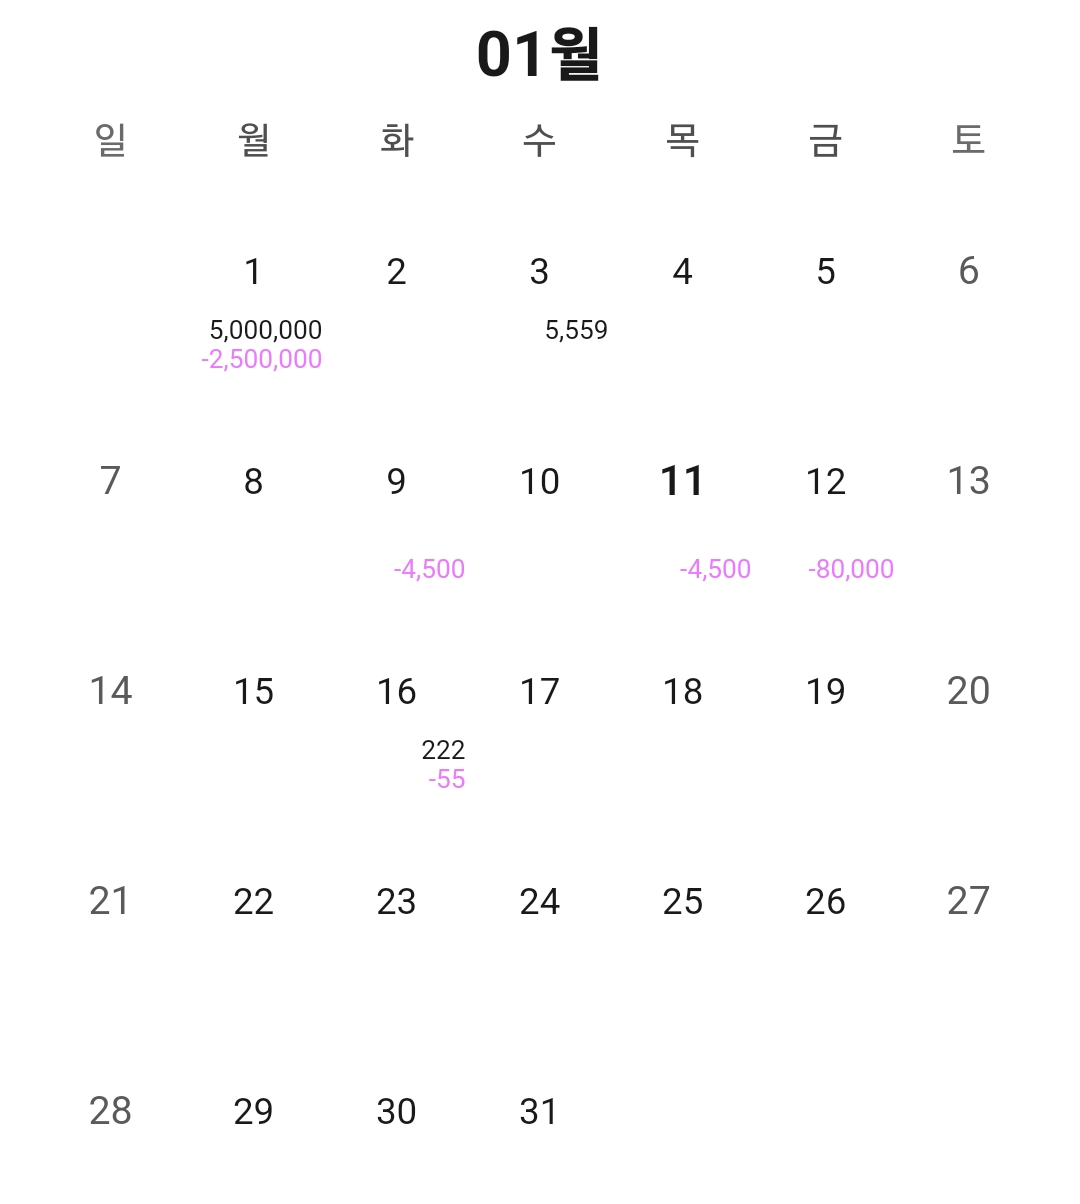
그 외 이벤트들이다.
markerBuilder 는 마커가 필요한 위치에 내가 원하는 텍스트를 넣으려고 사용 하는 것이다.
markerBuilder 를 사용 하게 되면 calendarStyle 에서 마커 관련 설정을 해도 무시 된다.
이러한 모든 소스를 합치게 되면
import 'package:table_calendar/table_calendar.dart';


  Widget canlendar() {
    return Obx(
      () => TableCalendar(
          //포커스 위치
          focusedDay: controller.isFocusedDay.value,
          //달력의 최초 일자 ( 젤 앞으로 어디까지 넘길 수 있는가 )
          firstDay: DateTime.now().subtract(const Duration(days: 365 * 10)),
          //달력의 마지막 일자 ( 젤 마지막으로 어디까지 넘길 수 있는가 )
          lastDay: DateTime.now().add(const Duration(days: 365 * 10)),
          //언어
          locale: 'ko-KR',

          //높이
          daysOfWeekHeight: 20,
          rowHeight: 80,

          //헤더 스타일
          headerStyle: HeaderStyle(
            formatButtonVisible: false,
            titleCentered: true,
            titleTextFormatter: (date, locale) {
              return '${DateFormat('MM').format(date)}월';
            },
            titleTextStyle: AppTextStyle().blackBold24,
            leftChevronVisible: false,
            rightChevronVisible: false,
          ),

          //달력 스타일
          calendarStyle: CalendarStyle(
            //선택 셀
            selectedTextStyle: AppTextStyle().blackBold16,
            selectedDecoration: BoxDecoration(
              color: null,
              shape: BoxShape.rectangle,
              borderRadius: BorderRadius.circular(12),
            ),
            //선택 셀

            //기본
            defaultTextStyle: AppTextStyle().color19191914,
            defaultDecoration: BoxDecoration(
              color: null,
              shape: BoxShape.rectangle,
              borderRadius: BorderRadius.circular(12),
            ),
            //기본

            // 전,후 달의 일자 표기여부
            outsideDaysVisible: false,
          ),

          selectedDayPredicate: (day) {
            return isSameDay(controller.isSelectedDay.value, day);
          },
          onDaySelected: (selectedDay, focusedDay) async {
            if (!isSameDay(controller.isSelectedDay.value, selectedDay) &&
                controller.isTouch.value == true) {
              await controller.onDateSelected(selectedDay, focusedDay);
            }
          },
          eventLoader: (day) {
            return controller.eventGetLoader(day);
          },
          onPageChanged: (focusedDay) async {
            controller.onDateSelected(focusedDay, focusedDay, gubn: 'month');
          },
          calendarBuilders: CalendarBuilders(
            markerBuilder: (context, day, events) {
              if (events.isNotEmpty) {
                return Positioned(
                  right: 1,
                  bottom: 1,
                  child: Column(
                    crossAxisAlignment: CrossAxisAlignment.end,
                    children: [
                      Text(
                        controller.getDaySumMoney(day, '0'),
                        style: AppTextStyle().black10,
                      ),
                      Text(
                        controller.getDaySumMoney(day, '1'),
                        style: AppTextStyle().colortitle10,
                      ),
                    ],
                  ),
                );
              }
              return SizedBox.shrink();
            },
          )),
    );
  }
처럼 사용 가능하다.
728x90
'Flutter & Dart' 카테고리의 다른 글
| Flutter & Dart 구글 애드몹 광고 추가하기 2. 개발하기 (0) | 2024.01.25 |
|---|---|
| Flutter & Dart 구글 애드몹 광고 추가하기 1. Google AdMob 설정 (0) | 2024.01.24 |
| Flutter & Dart Firebase 연동하기 3 - 로그인, 비밀번호 찾기 (0) | 2024.01.12 |
| Flutter & Dart Firebase 연동하기 2 - 회원가입 (1) | 2024.01.11 |
| Flutter & Dart Class 클래스 생성 및 사용하기 (1) | 2024.01.11 |


